
最近、OptiqueというTypeScript向けのCLIパーサー「コンビネーター」を作っています。Optiqueは、複雑なCLIを小さなパーツの組み合わせで記述できる様にしてくれます。そして、そのCLIのパース結果を型安全に扱う事が出来ます。(下記のコード参照)アイデアはHaskellのoptparse-applicative から得ましたが、TypeScriptはHaskellとAPIのスタイルがかなり異なる為、APIの面ではZod等を参考にしました。詳しい紹介はHackers' Pubに投稿した記事をご覧ください!
ALT text
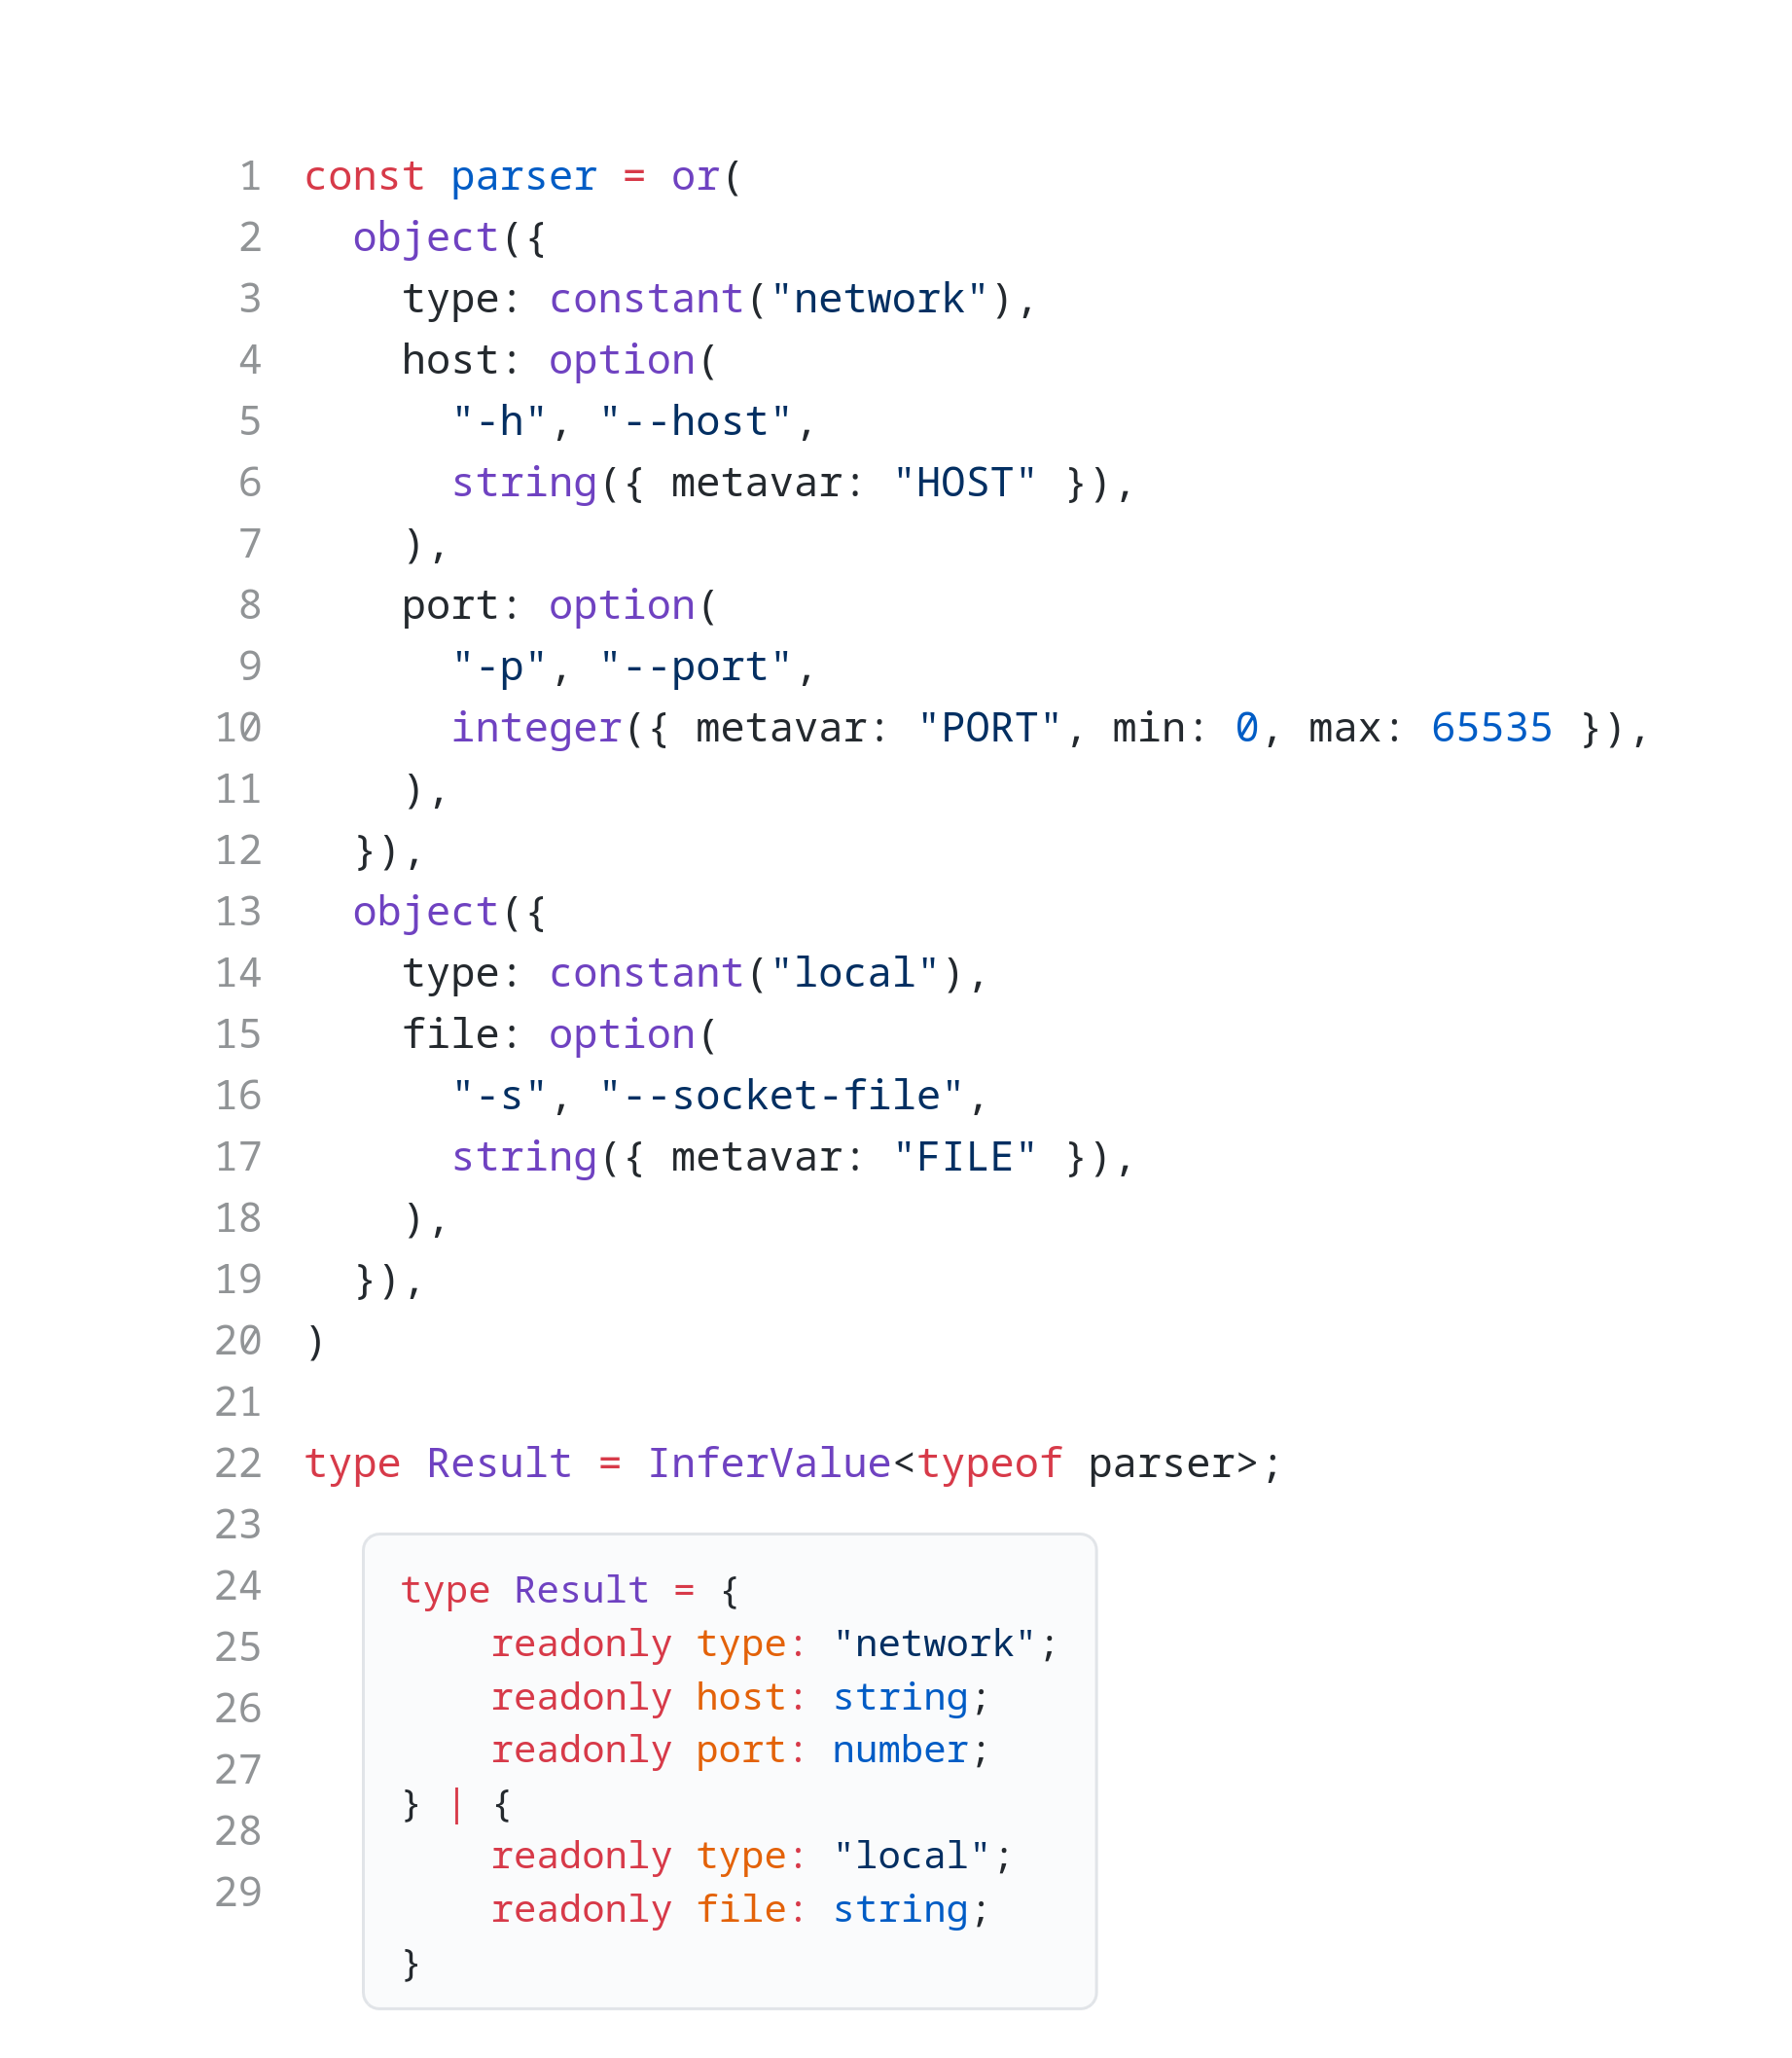
const parser = or( object({ type: constant("network"), host: option( "-h", "--host", string({ metavar: "HOST" }), ), port: option( "-p", "--port", integer({ metavar: "PORT", min: 0, max: 65535 }), ), }), object({ type: constant("local"), file: option( "-s", "--socket-file", string({ metavar: "FILE" }), ), }), ) type Result = InferValue<typeof parser>; // Resultの推論された型 type Result = { readonly type: "network"; readonly host: string; readonly port: number; } | { readonly type: "local"; readonly file: string; }
최근 Optique라는 다소 실험적인 CLI 파서 라이브러리를 제작하게 되었습니다. 이 글을 쓰는 2025년 8월 21일 시점으로 아직 0.1.0도 릴리스되지 않았지만, 나름대로 재미있는 발상이라고 생각해서 이 글을 통해 소개합니다.
Optique는 크게 두 가지 다른 라이브러리로부터 영향을 받았습니다. 하나는 Haskell의 optparse-applicative라는 라이브러리인데, 이 라이브러리로부터 얻은 교훈은 CLI 파서도 파서 컴비네이터가 될 수 있고, 그렇게 만들었을 때 매우 유용하다는 사실입니다. 다른 하나는 TypeScript 사용자들에게 이미 익숙한 Zod입니다. 비록 optparse-applicative에서 아이디어의 줄기를 얻긴 했지만, Haskell과 TypeScript는 너무나 다른 언어라서 API를 구성하는 방식에 큰 차이가 있습니다. 그래서 API를 구성하는 방식에 있어서는 Zod를 비롯한 여러 유효성 검사 라이브러리를 참고하게 되었습니다.
Optique는 여러 작은 파서들과 파서 컴비네이터들을 레고 부품처럼 조립하여 CLI가 어떠한 모양이어야 하는지를 표현합니다. 예를 들어 가장 작은 부품 중 하나로는 option()이 있습니다:
const parser = option("-a", "--allow", url());이 파서를 실행하려면 run()이라는 API를 사용하면 됩니다:
(참고로 run() 함수는 암시적으로 process.argv.slice(2)를 읽습니다.)
const allow: URL = run(parser);위 코드에서 제가 일부러 URL이라는 타입을 명시하긴 했지만, 굳이 그렇게 하지 않아도 저절로 URL 타입으로 추론됩니다. 위 파서는 -a/--allow=URL 옵션만을 받아들입니다. 다른 옵션이나 인자를 줄 경우 오류가 납니다. -a/--allow=URL 옵션이 주어지지 않아도 오류가 납니다.
만약 -a/--allow=URL 옵션을 필수가 아닌 선택으로 두려면 어떻게 해야 할까요? 그럴 때는 optional() 컴비네이터로 option() 파서를 감싸면 됩니다.
const parser = optional(option("-a", "--allow", url()));이 파서를 실행하면 결과로 어떤 타입이 나올까요?
const allow: URL | undefined = run(parser);네, URL | undefined 타입이 됩니다.
아니면, 아예 -a/--allow=URL 옵션을 여러 개 받을 수 있게 해봅시다. 아래처럼 쓸 수 있게요:
prog -a https://example.com/ -a https://hackers.pub/이렇게 옵션을 여러 번 쓸 수 있게 하려면, optional() 컴비네이터 대신 multiple() 컴비네이터를 씁니다:
const parser = multiple(option("-a", "--allow", url()));이제 슬슬 결과 타입이 어떻게 나올지 예상이 되시죠?
const allowList: readonly URL[] = run(parser);네, readonly URL[] 타입이 됩니다.
그런데, 만약 -a/--allow=URL 옵션과는 함께 쓸 수 없는 상호배타적인 -d/--disallow=URL이라는 옵션을 추가하려면 어떻게 해야 할까요? 둘 중 한 쪽의 옵션만 동시에 쓸 수 있어야 합니다. 이럴 때는 or() 컴비네이터를 사용하면 됩니다:
const parser = or(
  multiple(option("-a", "--allow", url())),
  multiple(option("-d", "--disallow", url())),
);
이 파서는 다음과 같은 명령들은 잘 받아들입니다:
prog -a https://example.com/ --allow    https://hackers.pub/
prog -d https://example.com/ --disallow https://hackers.pub/
하지만 다음과 같이 -a/--allow=URL 옵션과 -d/--disallow=URL 옵션이 섞여있을 때는 오류를 냅니다:
prog -a https://example.com/ --disallow https://hackers.pub/아무튼, 그럼 이 파서의 결과는 어떤 타입이 될까요?
const result: readonly URL[] = run(parser);이런, or() 컴비네이터가 감싸는 2개의 파서 모두 readonly URL[] 타입의 값을 만들기 때문에 readonly URL[] | readonly URL[] 타입이 되어, 결과적으로 readonly URL[] 타입이 되어버렸습니다. 제대로 된 변별 공용체(discriminated union) 형식으로 바꾸고 싶군요. 아래와 같은 타입이면 좋을 것 같습니다.
const Result =
  | { mode: "allowList"; allowList: readonly URL[] }
  | { mode: "blockList"; blockList: readonly URL[] };
이렇게 객체 형태의 구조를 만들고 싶을 때는 object() 컴비네이터를 쓰면 됩니다:
const parser = or(
  object({
    mode: constant("allowList"),
    allowList: multiple(option("-a", "--allow", url())),
  }),
  object({
    mode: constant("blockList"),
    blockList: multiple(option("-d", "--disallow", url())),
  }),
);
변별자(discriminator)를 부여하기 위해 constant() 파서도 사용했습니다. 이 파서는 조금 특이한 파서인데, 아무 것도 읽지 않고 주어진 값을 만들기만 합니다. 즉, 항상 성공하는 파서입니다. 이렇게 변별 공용체를 구성할 때 주로 쓰이지만, 다른 창의적인 방식으로도 쓰일 수 있을 겁니다.
이제 이 파서는 우리가 원하는 타입의 결과 값을 만듭니다:
const result:
  | { readonly mode: "allowList"; readonly allowList: readonly URL[] }
  | { readonly mode: "blockList"; readonly blockList: readonly URL[] }
  = run(parser);
꼭 상호배타적인 옵션들에만 or() 컴비네이터나 object() 컴비네이터를 쓰는 건 아닙니다. 서브커맨드도 같은 원리로 구현할 수 있습니다. 하나의 커맨드에 매치되는 command() 파서와 순서 인자에 매치되는 argument() 파서를 소개합니다:
const parser = command(
  "download",
  object({
    targetDirectory: optional(
      option(
        "-t", "--target",
        file({ metavar: "DIR", type: "directory" })
      )
    ),
    urls: multiple(argument(url())),
  })
)
위 파서는 아래와 같은 명령에 매치됩니다:
prog download --target=out/ https://example.com/ https://example.net/파서의 결과 타입은 다음과 같습니다:
const result: {
  readonly targetDirectory: string | undefined;
  readonly urls: readonly URL[];
} = run(parser);
여기에 upload 서브커맨드를 추가하려면 어떻게 해야 할까요? 맞습니다, or() 컴비네이터로 엮으면 됩니다:
const parser = or(
  command(
    "download",
    object({
      action: constant("download"),
      targetDirectory: optional(
        option(
          "-t", "--target",
          file({ metavar: "DIR", type: "directory" })
        )
      ),
      urls: multiple(argument(url())),
    })
  ),
  command(
    "upload",
    object({
      action: constant("upload"),
      url: option("-d", "--dest", "--destination", url()),
      files: multiple(
        argument(file({ metavar: "FILE", type: "file" })),
        { min: 1 },
      ),
    })
  ),
);
위 파서는 이제 다음과 같은 명령들을 받아들일 수 있게 되었습니다:
prog upload ./a.txt ./b.txt -d https://example.com/
prog download -t ./out/ https://example.com/ https://hackers.pub/
이 파서의 결과 타입은 다음과 같습니다:
const result:
  | {
      readonly action: "download";
      readonly targetDirectory: string | undefined;
      readonly urls: readonly URL[];
    }
  | {
      readonly action: "upload";
      readonly url: URL;
      readonly files: readonly string[];
    }
  = run(parser);
같은 방식을 응용하면 겹쳐진 서브커맨드(nested subcommands)도 구현할 수 있겠죠?
자, 이렇게 Optique가 CLI를 표현하는 방식을 보여드렸는데요. 어떤 것 같나요? Optique의 방식이 복잡한 CLI를 표현하기에 적합하다는 게 와닿으시나요?
물론, Optique의 방식도 완벽하지는 않습니다. 아주 전형적이고 단순한 CLI를 정의하는 데에는 오히려 더 손이 가는 것도 사실입니다. 또한, Optique는 오로지 CLI 파서의 역할만 하고 있기 때문에 일반적인 CLI 앱 프레임워크가 제공하는 다양한 기능은 제공하지 않기도 합니다. (추후 Optique에 더 많은 기능을 추가할 예정이긴 합니다만…)
그럼에도 Optique의 접근 방식에 흥미를 느끼셨다면, 소개 문서나 튜토리얼도 한 번 살펴보시기 바랍니다.

unstable.optique.dev
Optique tutorial: Build type-safe CLIs step by step | Optique
This tutorial walks you through building type-safe command-line applications using Optique's parser combinators, starting from simple options to complex subcommands.